Yesterday I was able to get the project up onto a github repository:
https://github.com/qarnac/windexplorer3d
There were several problem I ran into using git with github. First, it turns out that if there is a git repository already created on github, I need to pull it into my local repository even though the one on github is empty. Trying to just push or clone my repository onto github will not work. Second, there is a bug in the JME3 IDE git plugin as far as I can tell. The git plugin would return authorization errors trying to push onto github, even though the same exact command from a command line would work. This took me a long time to figure out.
Tuesday, August 28, 2012
Monday, August 20, 2012
Bring it all together to present
Last Friday I presented my project, along with a poster, to the people of ViaSat and also TeraData. Since the project is still in development, there were a lot of temporary assets and debugging features turned on. On Thursday night I went through and replaced most of these to make the game more presentable.
I added a background for the main menu and also changed the buttons a little bit. Here is the current look of the main menu:

I replaced all the intro scene to the demo level so that it now tells a story to the player about why they are flying around. Here is the new intro scene:
These are actually STILL temporary assets, since I am not an artist. However, they are much better than what they replaced.
Finally, I wrapped up a lot of debugging/temporary code to make the game playable. Things such as turning back on the altitude ceiling so the user cant go up forever, etc.
Thursday, August 9, 2012
Fixed the bugs from yesterday
Today I fixed the bugs from yesterday's updates.
Specifically, I fixed a bug where when the user presses the space bar to "land" and see if that spot is correct, the timer would get stuck until that text went away. This was caused by a new "textLockout" function I put in yesterday to stop the input of new text to the HUD while something important is being shown. This also stopped the timer from being redrawn to the screen, though it was still being updated in number(the time was correct, just not visible for 6 seconds or so). I reorganized how the HUD system worked and it fixed the bug.
Another bug fixed was the string input from the user trying to "land" being super long. I was unable to think of a good way to auto shorten these inputs to be displayed on the HUD, so I made it so that in the config file where these strings are placed, the maker can add "++" at the end of each line to indicate the next line is apart of that string also and to add a "\n" in between them. For example:
This is an example++
of my fix.
Would become "This is an example\nof my fix." in my program, and would display correctly in the HUD.
There were also a few other small fixes, mostly from the win screen breaking some functionality of the sounds.
Wednesday, August 8, 2012
Lots of work done today
Today a lot got done. I made a lot of progress on some of the items what were missing from the game. For example, there are now indicators on each of the placement objects, telling the player where he/she should fly to, to see if they should build a wind farm there. This was done in the form of smoke rising from the ground. Eventually I want to put an object at the origin of the smoke.

Also, there is a win condition now! That makes this officially a real game now, as you can run out of time and lose the game, or you can find the correct build spot and win the game. Right now the player just presses the space bar and gets a message on the HUD about the area, but in the future it is planned that the player will land and get a short speech about the area.
There are several bugs that came up from today's building, but I ran out of time to fix them, so that will be for tomorrow.
Finally, you can check out the progress I made today by running my webstart application:
moe006.cs.csusm.edu
Tuesday, August 7, 2012
some more tools to help make levels
Today I made some more tools to help design levels. Mostly a bunch of small little changes to make the level designer not have to dig through code so much. One example of something I added is a debug flag you can set to true to create and texture shapes for the placement objects, which are read in from the config files, and show them in the game. This will make is far easier to visualize where these shapes are and to make sure the whole map has a shape under it. Here is a picture of two test shapes in my level:

I am also using the height setting that I added last time for these shapes. Normally these shapes would be invisible and below the terrain, but I make them visible and above the terrain while I'm building this level.

I am also using the height setting that I added last time for these shapes. Normally these shapes would be invisible and below the terrain, but I make them visible and above the terrain while I'm building this level.
Thursday, August 2, 2012
Sounds and More
So today was mostly about sounds. After making another scene where the user can win the game, I saw a need for some little sound bits to play. So, I experimented with an easy way to create simple 8-bit sounds. I have created a few that I will put in the game for now. Unfortunately Blogger will not let me upload the .wav file I created as a "video", so I will have to find another way to play sounds here.
Also, I went through and replaced some older code that was put in place temporarily to get level one developed. This old code was hard wired to start level one, making adding more levels difficult. Now there is a small system that level designers must use so that they dont have to dig through the code so much. In the Main class, wherever there is a point where the engine must display something that is dependent on what level the user is on (for example: display the game over scene... but which level's game over scene do we display!?!?!) the game engine will call a router method. This method is just a big switch so that the level designers can make sure the appropriate scenes and what not are displayed for what level the user is on. Here is an example:
public void routerForEndLossScene(){
if(currentLevel == 1){
show level one's loss scene
}//if
if(currentLevel== 2){
...
}//if
...
}//method
I'm not sure if this is the best way of handling this sort of problem, but it is a simple one. All these router methods are in the same location, making adding levels somewhat easier.
Tuesday, July 31, 2012
End game
Today I made an end game! By that I mean that there is now a "game over" scene that plays when the time runs out in any level. There also can be different game over scenes for each level, if the designer so chooses and can be made to happen via the introscene config file.
Here is a quick video of the game over screen, along with its ability to return to the main menu once the user has seen the game over screen for a defined amount of time:
Here is a quick video of the game over screen, along with its ability to return to the main menu once the user has seen the game over screen for a defined amount of time:
Monday, July 30, 2012
Late start
Today I was only able to work for 2 hours, so not as much was done as I would have liked. In that time, I did add some more options to some of the config files. For example, a "height" option in the placement shapes config file that does exactly what it says, it adds individual heights to objects. Before, I just manually placed all the objects read in from the config file at "-10" in the Y axis, so that they were all below the map. Individual heights lets objects overlap each other in predictable ways, but on different planes in height (all of which must be below the map!). I also did some other smaller tasks, none of which are really worth mentioning though.
Thursday, July 26, 2012
Fixes and cleanup
Today I fixed some of the problems I was having along with cleaning up and documenting my recent code.
I fixed the issue where, when the camera was tilting forward, the camera would lose altitude. The camera physics engine I built has a parameter for its update function that requires the looking direction of the camera. When the camera was tilted up or down, that vector changed, causing problems. I fixed it by removing the y-component of that vector, a temporary fix but it works for now.
Further, I found that the webstart works and have updated the build on my server to the most recent one. Enjoy: http://moe006.cs.csusm.edu/
NOTE: I changed the keys to control the altitude and have not updated the intro screen that tells you the keys yet.
KEYS: W,A,S,D will move the helicopter forwards, backwards, left, and right.
Q, R will rotate the helicopter right and left.
+, - will raise and lower the helicopter in altitude.
Wednesday, July 25, 2012
More Helicopter Like
Today I got around to making the camera have a tilting effect, so it appears more helicopter like. Instead of trying to describe in words what it looks like, here is a short clip of it in action!
I only have one problem to fix with this: the camera loses altitude now when moving forward. I'm sure this is from tilting the camera's orientation forward, so "move forward" for the camera is now slightly towards the ground. Another thing to fix!
Tuesday, July 24, 2012
Civilization
First off, I was able to solve the black screen problem I was having earlier. I did this by using a different way of accessing the assets. I was using old code is what the problem boiled down to. Once I found a new way to load in the assets, the problem went away.
Today I was able to finish what I wanted to do before the black screen problems. I am putting objects into the levels to give the game more than just flat ground. Here are some pictures of my town:

EDIT: looking at the pictures now, the shadows appear to be too intense. I put the game light about where the sun is in the cube map (the picture in the background), which is why the shadows are this intense. I think I will raise the game light up a bit tomorrow!
I have not yet hooked the model upto the physics engine to prevent the helicopter from flying through the buildings.
Loading trees into the game now will not be hard at all, though I have not yet decided on a way to put trees into the game. Making Vector3f (three float values) coordinates for each tree in a level is a daunting task. I still am thinking of different ways to do this, hopefully some googling will turn up something!
Friday, July 6, 2012
First level
Today I designed and created the first level for the game. Here is a quick fly around of the level, though it is shrunken from what it is going to end up being:
I have some models that I found online and have loaded into the game engine that I want to spread throughout the level, however I have come across a problem. If I attach any of these models to the root node, I get a black screen in the game. I have tried scaling and moving the models away from the camera to make sure it is not an issue with the camera being inside the object, but that is not it. Here is a video showing the bug I have:
Hopefully this problem will not take much longer to figure out, and some time away from it will make the solution more obvious to me.
Thursday, July 5, 2012
invisible shapes!
Today I finished up two mechanics.
The first is the "invisible placement map" mechanic, although I had to use 3d shapes now instead of a map. This is the mechanic for when a user tries to place a wind farm somewhere, the camera position is checked against these invisible shapes, and if a shape is under the user then that shape represents a reason for not placing that wind farm there.
I had to switch from a map to shapes because I ran into a problem with the map idea. My original plan was to try and lay an invisible image onto the terrain, much like a height map, and check the values of this map for why you should or should not build here. The advantage of this was that the image should stretch with the terrain if a programmer wanted to stretch the terrain to make it bigger. Also it would be very easy to create this map, since you could use a painting program to make and modify it. However, JME3 does not like unknown maps at all, and would throw exceptions when a map that did not have the correct name was added. Further, if I tried to replace some other map that was not being used with my placement map, JME3 would turn on that unused map and the terrain would look very strange. This is the reason I decided to go with 3d shapes instead. I made another txt file reader that reads in from a config file all the different shapes that are in any level. Then, in a class I wrote, these objects are spawned through out the world according to the config's parameters. Then it is simple to do a ray cast straight down from the camera to see if any of these shapes are hit.
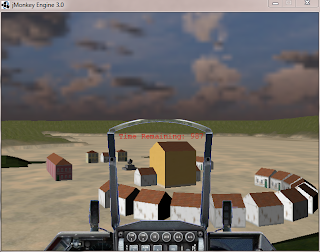
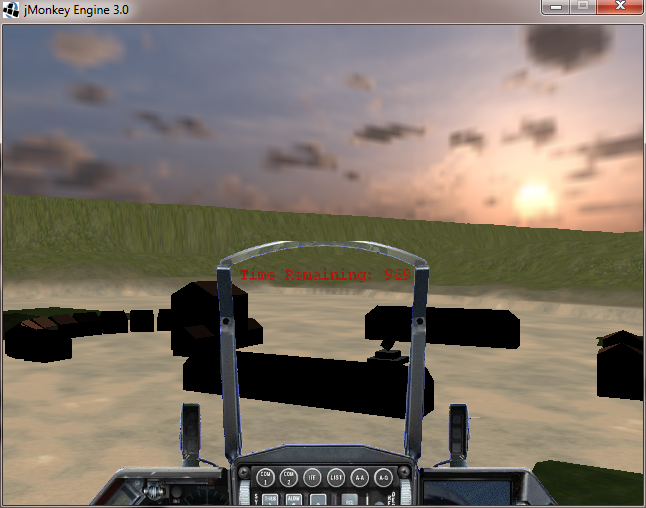
The second mechanic I accomplished is to make a system for displaying the remaining time left in the level. I decided to add this to the HUD on the cockpit, since it looked nice this way. There isn't an end game screen yet, but it should be simple to make as it is just like the starting screens I made a few days ago.
Both of these new features can be seen in this video. Note: The output of why a user cant build there on the HUD is just for testing. The final way for the user to get this information will be from an interactive beacon that he must go near (and eventually land on) to get this information.
The first is the "invisible placement map" mechanic, although I had to use 3d shapes now instead of a map. This is the mechanic for when a user tries to place a wind farm somewhere, the camera position is checked against these invisible shapes, and if a shape is under the user then that shape represents a reason for not placing that wind farm there.
I had to switch from a map to shapes because I ran into a problem with the map idea. My original plan was to try and lay an invisible image onto the terrain, much like a height map, and check the values of this map for why you should or should not build here. The advantage of this was that the image should stretch with the terrain if a programmer wanted to stretch the terrain to make it bigger. Also it would be very easy to create this map, since you could use a painting program to make and modify it. However, JME3 does not like unknown maps at all, and would throw exceptions when a map that did not have the correct name was added. Further, if I tried to replace some other map that was not being used with my placement map, JME3 would turn on that unused map and the terrain would look very strange. This is the reason I decided to go with 3d shapes instead. I made another txt file reader that reads in from a config file all the different shapes that are in any level. Then, in a class I wrote, these objects are spawned through out the world according to the config's parameters. Then it is simple to do a ray cast straight down from the camera to see if any of these shapes are hit.
The second mechanic I accomplished is to make a system for displaying the remaining time left in the level. I decided to add this to the HUD on the cockpit, since it looked nice this way. There isn't an end game screen yet, but it should be simple to make as it is just like the starting screens I made a few days ago.
Both of these new features can be seen in this video. Note: The output of why a user cant build there on the HUD is just for testing. The final way for the user to get this information will be from an interactive beacon that he must go near (and eventually land on) to get this information.
Monday, July 2, 2012
A Game Is Forming
First, I ended up switching out two of the milestones for the week. It turned out that the two I had for today was too much, so instead I added sound today and also an intro scene.
First off, I created a system for adding intro scenes for each level. The scenes are just pictures that can have anything on them, that should tell the story of that particular level. To demonstrate I just put some text on a .png file, but before release these should be replaced with nice images. The scene its self is all loaded from config files, so it is easy to add more scenes for new levels.
One pitfall that took me a while to figure out which shouldn't have was trying to load in the images using the JME3 asset manager. In short, it turns out for some reason firefox was naming my files ".png" while GIMP was naming my edited files ".PNG", which I did not immediately pick up on and does in fact cause JME3 to freak out and not load that file. What a face-palm moment when I saw the extension difference.
Second up is sounds. JME3 makes it easy to implement sounds. Since the importing and memory management is all taken care of, I went on making a very nice handling class (SoundsManager) for all the sounds that will be in my game. This class initializes and manages all the sounds, and other classes just have to call my functions to do all kinds of things with any of the sounds.
Here is a video showing what was accomplished today:
NOTE: I had trouble recording sounds and video playing on my desktop and had to resort to holding up my mic to my speakers, so the sound quality is poor in this video.
Last Week Crunch
This is the last week I have for this summer project, so it is time to get as much done as I can!
For this week, I plan on creating enough game mechanics to have a functioning game. My plans are to accomplish one major mechanic a day.
Today I plan on making two mechanics. The first is the mechanic that tells the user if they should build the wind farm where they currently are or not through the use of the HUD. I will use an "invisible map" to look up what problems the user would face building a wind farm where they are. For example, "You can't build here, the land costs too much!" Or something like that would appear if they tried to build on the coast line. The second mechanic is an opening scene of some kind to inform the player what the objective of the level is. I was thinking of using multiple 2d screens to tell a quick story about each town and why they need wind power fast! It would be sort of like a book telling of the story before they jump into the 3d world.
Tuesday I plan on getting sounds into the game to give the player a better experience. Also for a smaller project, i want to get a visible timer so the player can see how much time they have left to build the wind farm.
Thursday I plan on using what I have created so far to make a well designed level (or more depending on how long it takes), with models for the city and scenery like trees. The level will also include the invisible map of where the player can or cant build the wind farm.
Friday will be for general improvements and bug fixes, along with anything else that comes up.
Thursday, June 21, 2012
Terrain Collision detection
Today I implemented collision detection between the camera and the terrain. Here is a short clip showing this collision detection in action:
To do this, I added an invisible shape (a capsule, but it could be anything really) to the scene graph that I use as the camera's physical space representation. By that, i mean that object takes up as much space as the camera and it's vehicle take up, and I simply move this object around and use JME3's built in collision detection mechanic to see where that object is able to move. Then I just manually moved the camera to this invisible object's location, and it is as if the camera had collision detection itself.
The part that I had the most trouble with was hooking up my own camera physics class with JME3's collision detection mechanics. With a bit of trial and error, I found the best way to do this was to just use JME3's CharacterControl class, which has a very simple physics engine that mimics a player-character's movement. What I did was to send my own physics engine's movement calculation to it, which act as a suggestion on where to go, and the CharacterControl will then tell if that is a viable movement and either go there or not. Then I just update my own physics engine with the results of the CharacterControl. Here is my moveCamera code, which is called from the main update loop, to hopefully help explain:
public void moveCamera(Vector3f move, float rotation){
//remember the previous position vector.
positionVectorClone = positionVector.clone();
//Movement
positionVector = positionVector.add(move);
**this is the CharacterControl**
//move the physics body, walk in the direction of the difference
//between the original position vector and the news one.
cameraPhysicsBody.setWalkDirection(positionVector.subtract(positionVectorClone));
System.out.println("move Vector: " + move);
System.out.println("position Vector: " + positionVector);
//Put camera onto its physics body.
cam.setLocation(cameraPhysicsBody.getPhysicsLocation().clone());
//reset position vector to reflect what the phsyics engine actually moved.
positionVector = cameraPhysicsBody.getPhysicsLocation().clone();
**rotation was not effected by the new collision detection**
//Rotation
quat = new Quaternion();
quat.fromAngleAxis(rotation, Vector3f.UNIT_Y);
cam.setRotation(quat);
}
Wednesday, June 20, 2012
HUD concept
Today I was able to create a proof of concept for a heads up display. The text can be placed anywhere on screen, but I placed mine in the cockpit image's HUD display. Here is an image of my concept:

I still have to make a class that controls the text that is input into the hud, since the text can go right off the cockpit's display if "\n"s are not inserted. Also I want to make it very easy for other programmers to control what all is being displayed. Another thing I wanted to do to this HUD is apply a little green to it. To do this, I was thinking about adding a transparent green shape to the guiNode in this location. Should be easy, and would look very cool!
Also today, since I gained admin access to my server provided from the school, I looked into implementing Java Webstart. I found out where the httpd.conf file is for Apache on Red Hat (etc/httpd/conf/httpd.conf) and added the additional AddTypes required for Webstart (Link). Next I found where Apache looks to for its index.html file (var/www/html/index.html) and put in my own hello world file in, and it works! Link
However, I found a new problem. When I was testing out how I was going to get the jar files onto the server, I noticed that my game doesn't work when you run it from the .jar file outside of the IDE! The menu works, but when you press "play" the screen goes black. Im thinking the game is not able to find all my assets, even though I have not moved them from the "dist" folder that the IDE generates. I will look into this first thing tomorrow.
Tuesday, June 19, 2012
camera profile changing
Today I implemented my "camera profile" mechanic.. The camera profiles allow me to switch between different camera physics settings all via the config files. The way it works is that in the MasterConfig.txt (which cannot be changed in path or name) there is a path to another config file, which I have called CameraConfig.txt but can be named or placed anywhere. Here is an exact copy of my camera config file:
// CURRENT CONFIG FILE FORMAT:
// number of prifiles
// //
// float maxVelocity
// int impulseXZ
// int impulseY
// float frictionX
// float frictionY
// float frictionZ
// float frictionYRotation;
// float rotationYImpulse
// float rotationYVelocityMax
// int mass
//--------------------------
//--------------------------
//--------------------------
2
//--------------------------
//helicopter cam
//--------------------------
//max Velocity
10
//impulse in XZ plane
15
//impuse Y plane
5
//friction X
2
//friction Y
4
//friction Z
2
//Rotation friction Y
3
//Rotation Impulse Y
.08
//Rotation Velocity Max Y
.08
//Mass
100
//-----------------------
//walking cam
//-----------------------
//max Velocity
1.8
//impulse in XZ plane
4
//impuse Y plane
0
//friction X
10
//friction Y
10
//friction Z
10
//Rotation friction Y
15
//Rotation Impulse Y
.15
//Rotation Velocity Max Y
.08
//Mass
100
My ConfigReader class reads in this file, and creates and fills out an array of custom data-holding classes filled with data the data found above. Since this array's size is dependent on the first line in this config file, there is no real limit to how many profiles there can be.
The use for this feature is that I can now switch between helicopter and walking physics profiles with a simple function call: camPhys.setPhysicsProfile((short) indexOfProfileHere ); After that call, the camera will behave completely differently, e.g. going from helicopter controls to walking controls.
Tomorrow I will work on getting a popup window for displaying game dialog. I want to try and get it to display in the cockpit's heads up display, but if that turns out to be too hard I will use the well used game mechanic of displaying game dialog in a boxed popup towards the bottom of the screen, something like:

Thursday, June 14, 2012
flying cameras
Well, here is a video of my camera controller so far. It might not be as apparent when you are not pushing the buttons, but there is momentum in the camera now. I am not always pushing the move buttons in this film, sometimes the "weight" of the camera is moving it, which gives the player more feed back and makes it appear more like a helicopter now.
Here is a quick way for keeping track of local physics stats for an object (a camera in my case) like it's velocity: When keeping these variables, keep the coordinate systems relative to that object. So for the camera, I kept the velocity vector's coordinate system the same as the camera's local coordinate system, or rather I kept the positive x-axis on the velocity to move the camera to it's right. Then when it comes time to move that object relative to the world space (so a positive x-axis velocity might move the camera any direction!) find out how you need to rotate the camera's local coordinate system to match that of the world coordinate system, then apply those same rotations to the movement vectors. Here is my code to do this for my camera:
//make a quaternion that rotates the velocity vector
//from camera space to world space. Only on X-Z plane right now.
//
lookAt is a convienence method for auto-setting the
quaternion based on a direction and an up vector.quaternion.lookAt(camOriginalDirection, Vector3f.UNIT_Y);
movementVector = quaternion.mult(velocity);
Wednesday, June 13, 2012
Zero Means Ten in JME3
So a quick update from yesterdays camera problem I was having. It turns out I was having a brain fart, since the camera actually was moving! The mountain that the camera looks at by default was so far away that I just could not notice the movement... we all make newb mistakes every now and then.
Anyways, I have found a new problem that is very strange. After doing more work on the camera system, I went to test out what I had created. When I started the game, the camera took off at blazing fast speeds in the y direction. After poking around and reviewing the code for a while, I decided to test out JME3's debugger. I was quick to find the problem. In short, the Vector3f class's static ZERO vector has a positive ten value for the y direction. Below is what I found when debugging:

Maybe this is me being a newb again, but shouldn't the ZERO vector be all zeros? Anyways, I experimented with different ways to initialize the vector, and here are the results:

So I need to go through and change all my code that has vectors in it so that they get zeroed out properly. On a side note, the JME3 debugger works great (being based on netbeans I would expect it to) and I'm sure this wont be the last time I will be using it.
The camera system is turning out to be more challenging then I had thought, but I think it will be very nice and add to the users experience in the end.
Tuesday, June 12, 2012
Changes and Problems
Today I spent the majority of my time trying to get the camera to control like I wanted it to. There seems to be something I am missing, as any changes I do on the main update method do not get reflected in game. So I can position the camera where I want it initially, but on the update method if I try and move the camera nothing happens, and I use the same method to do both of these so something funny is happening that I need to figure out. I am also experimenting with attaching the camera to a node and moving the node around, I will be sure to post the solution to this problem when I figure it out!
I also learned about AppStates today, which is a JME3 built in way of changing different "states" of game play very quickly. For example, if you change from first person to third person, those could be two different AppStates. AppStates can also change entire scenery, so you could potentially use AppStates to define different levels. What is nice about AppStates is that they give access to all the Main class's SimpleApp objects, such as the root node, assetmanager, soundmanager, etc. AppStates also hook into the update method and other very useful methods, so updating these AppStates is very easy to do. So I am somewhat torn between carrying on with what I have, which is passing in pointers of the required objects to the classes I make, or if I should convert them to AppStates.
I also learned about AppStates today, which is a JME3 built in way of changing different "states" of game play very quickly. For example, if you change from first person to third person, those could be two different AppStates. AppStates can also change entire scenery, so you could potentially use AppStates to define different levels. What is nice about AppStates is that they give access to all the Main class's SimpleApp objects, such as the root node, assetmanager, soundmanager, etc. AppStates also hook into the update method and other very useful methods, so updating these AppStates is very easy to do. So I am somewhat torn between carrying on with what I have, which is passing in pointers of the required objects to the classes I make, or if I should convert them to AppStates.
Monday, June 11, 2012
Custom Camera Controls
Today I stopped using the built in camera controller and made my own. By default, the SimpleApp class in JME3 has a camera built in (cam) and an "appstate" that extends this camera called "flycam". Flycam is nice for debugging and such since it comes with built in WASD controlls and mouse rotation, but for my project it needed to be replaced. Building my own flycam replacement was important because it allows more control over how the user inputs are handled. Now any kind of input device can, with some work, be made to work with the game.
All that is left to do on my controller is to play around with the way the camera gets moved so that it feels more like a helicopter and less like a flying super camera. By this I mean there should be acceleration and momentum to the movement, and when not moving the camera should return to a position parallel to the ground like it was hovering. Also, though it should be very simple now to make different perspectives (such as first person) I have not tested this out yet, so that also needs to be done.
All that is left to do on my controller is to play around with the way the camera gets moved so that it feels more like a helicopter and less like a flying super camera. By this I mean there should be acceleration and momentum to the movement, and when not moving the camera should return to a position parallel to the ground like it was hovering. Also, though it should be very simple now to make different perspectives (such as first person) I have not tested this out yet, so that also needs to be done.
Wednesday, June 6, 2012
Main Menu and Cleanup
Today I was able to get a menu system in place using JME's "Nifty GUI" technology. This technology is very powerful from the demos I watched, and I dont expect to use even a fraction of that power in my game but it's nice to know what it can do. The menu I created is very expandable, even dynamically expandable!
Here is a short video of the menu, along with a small bit of flying around my terrible testing level:
The Nifty GUI works a lot like Android in that you have Scenes (android activities) that hold different panels (android layouts) and have controls (android buttons and such) on them. This is all changeable on the fly. One example of this is that when a config file loads in, if the file cannot be found I let the GUI know this so that it can inform the user the file was not found. When there is no reading error, the user does not see any error texts.
Also of note was a lot of cleaning up of the code; adding comments, putting large blocks of related code in new classes, etc.
Here is a short video of the menu, along with a small bit of flying around my terrible testing level:
Also of note was a lot of cleaning up of the code; adding comments, putting large blocks of related code in new classes, etc.
Tuesday, June 5, 2012
Cube Maps and Terrain
Today, I got some of the basic visuals working in game, such as the terrain, a static cockpit, and a skybox. I did the loading of these files through the use of external config files, this way changes can be made to maps without recompiling the game. I plan on eventually making a master config file that a user can edit to tell the game to automatically look for his added config files and assets.

All the assets I made today are very much prototypes, just used to make sure everything is loading. However, all that needs to be done is replace those assets with nicer ones and everything is good to go, that's nice!
As you can see in the picture, the changes in terrain height are a little abrupt! The temporary height map I made just had grey lines around the edges, no nice transition from black to grey. Again, just a test to see if the config file was getting the height map to the game engine.
For tomorrow, I plan to start working on a main menu, since a lot of what I am writing could be a little more final if I had a main menu.
Monday, June 4, 2012
Physics and Terrain
For the collision detection, jMonkeyEngine does most of the heavy work, which is very nice! All the user must do is add bounding shapes over the object they want to have physics applied to, and then register those objects with the physics engine. Also, its very important to change the way you move that object and go through the physics engine, not through the setLocalTranslation() method.
Terrain in JME is handles through the use of height maps and texture splatting maps. Instead of storing every single point in the terrain's height, we just make a much smaller map of the height of the terrain and interpolate that map across the much larger game terrain. Here is an example of a height map:
 The whiter the color, the higher the terrain. Thus, this map makes a mountain in the middle of the terrain, with another steeper peak in the top left.
Texture Splatting is similar in concept. There is a small map of colors that determine which texture will be loaded to that area of the terrain. For example, if you assign the color red to mean load a grass.png texture and blue to load ice.png, then the above height map will have blue where the peaks are and read where the valleys are.
That wraps up the tutorials for now, next I will begin to create the Wind Explorer game!
The first thing I worked on is seeing how to setup and load a scene. Scenes are an organization of objects that can be quickly loaded into the game engine with two lines of code. Behold:

Blue Pies! These three pies were loaded into the initApp() function at those locations with only this code:
Spatial scene = assetManager.loadModel("Scenes/pie.j3o");
rootNode.attachChild(scene);
Scenes themselves have a graphical editor to them, making building of a game a little less trial and error. Here is a picture of what the scene editor looks like:

More to come!
Terrain in JME is handles through the use of height maps and texture splatting maps. Instead of storing every single point in the terrain's height, we just make a much smaller map of the height of the terrain and interpolate that map across the much larger game terrain. Here is an example of a height map:

Texture Splatting is similar in concept. There is a small map of colors that determine which texture will be loaded to that area of the terrain. For example, if you assign the color red to mean load a grass.png texture and blue to load ice.png, then the above height map will have blue where the peaks are and read where the valleys are.
That wraps up the tutorials for now, next I will begin to create the Wind Explorer game!
The first thing I worked on is seeing how to setup and load a scene. Scenes are an organization of objects that can be quickly loaded into the game engine with two lines of code. Behold:

Blue Pies! These three pies were loaded into the initApp() function at those locations with only this code:
Spatial scene = assetManager.loadModel("Scenes/pie.j3o");
rootNode.attachChild(scene);
Scenes themselves have a graphical editor to them, making building of a game a little less trial and error. Here is a picture of what the scene editor looks like:

More to come!
Game Design Document
Last Friday was spent going to a brainstorming meeting in which the final game was discussed. From this meeting, I have made a game design document. Below is a link to this document:
GDD Link
Note: This document can change to reflect design changes.
GDD Link
Note: This document can change to reflect design changes.
Thursday, May 31, 2012
Stuck!
So in doing exercise 3 in tutorial 8 (picking) today, I ran into a problem with adding a custom name to a Spatial (Geometry's parent class). In this case, I wanted to name the Golem in the scene to "test" for easy testing to see if it was the closest object hit by a ray cast. Doing the following test when the golem spatial is initialized and loaded works fine:
...
golem.setName("test");
System.out.println(golem.getName() + "!!!");
...
the output is "test!!!" in the console as expected. However, doing the following after doing a ray cast does not work:
...
Geometry closestGeom = closest.getGeometry(); //This is the golem when he is clicked on.
System.out.println(closestGeom.getName() + "###"); //should be outputting "test"...
...
What is output is "Oto-geom-1###", which seems like an auto generated name made from its filename or a name in its .xml file. If I changed my if statement to check for that name (Oto-geom-1) then everything would work fine. However, I really need to figure out how to add custom names to objects. Hopefully the solution will come to me asap...
Picture:
 Note: The red dot is the hit indicator, where the user last clicked on the model and made it rotate.
Fixed Edit:
So as I was trying a workaround of adding the golem to new node (named "golemNode") and then using that node as the character identifier, when I figured out the original problem. When I ran these two lines after the ray cast:
System.out.println(closestGeom.getName() + "------------");
System.out.println(closestGeom.getParent().getName() + "------------");
I was expecting to get in the console:
Oto-geom-1------------
golemNode------------
However I instead got:
Oto-geom-1------------
test------------
"test" being the original name I had been giving the spatial. Calling getParent() one more time in the above System.out would indeed print "golemNode-------". I am stuck no more!
...
golem.setName("test");
System.out.println(golem.getName() + "!!!");
...
the output is "test!!!" in the console as expected. However, doing the following after doing a ray cast does not work:
...
Geometry closestGeom = closest.getGeometry(); //This is the golem when he is clicked on.
System.out.println(closestGeom.getName() + "###"); //should be outputting "test"...
...
What is output is "Oto-geom-1###", which seems like an auto generated name made from its filename or a name in its .xml file. If I changed my if statement to check for that name (Oto-geom-1) then everything would work fine. However, I really need to figure out how to add custom names to objects. Hopefully the solution will come to me asap...
Picture:

Fixed Edit:
So as I was trying a workaround of adding the golem to new node (named "golemNode") and then using that node as the character identifier, when I figured out the original problem. When I ran these two lines after the ray cast:
System.out.println(closestGeom.getName() + "------------");
System.out.println(closestGeom.getParent().getName() + "------------");
I was expecting to get in the console:
Oto-geom-1------------
golemNode------------
However I instead got:
Oto-geom-1------------
test------------
"test" being the original name I had been giving the spatial. Calling getParent() one more time in the above System.out would indeed print "golemNode-------". I am stuck no more!
Getting into Blender
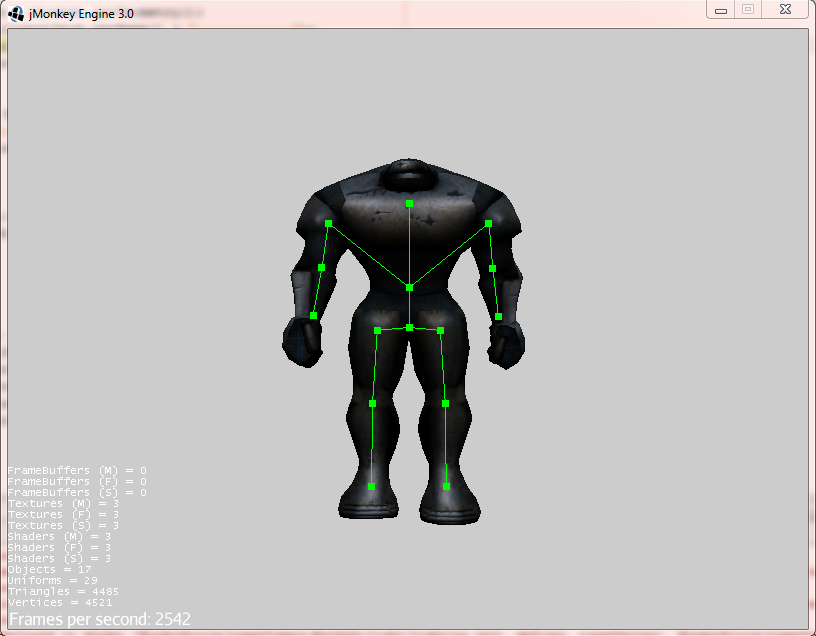
Next up in the tutorials was 3D animations. This is one aspect of game making that I have no experience with, so I was very interested in seeing how it was done. I have worked a little in Blender in the past so I was not completely overwhelmed, though I was a little surprised at what I found for animations.
The jMonkeyEngine tutorials encourage (requires?) people to use the Ogre xml format, which can be output from blender using a free plugin, for 3D modeling and animation. Looking inside one of the files generated, the skeleton.xml file, it's very interesting to see how animation works! Basically, they have the concept of "bones" which they attach to each other in a tree, and each bone represents a different mesh in the object. Next, the xml file will have many animations defined (walking, standing, etc), with each animation further divided into different tracks. These tracks are used to control each bone in that animation. In a bone's track, there are many keyframes that are locked to a specific time (in my xml file it's to the 6th decimal place of a second) which will translate, rotate, and scale that bone at that time. Here is a small sample of a track in my xml file:
<track bone="spine">
<keyframes>
<keyframe time="0.000000">
<translate x="0.000000" y="-0.161123" z="0.000001"/>
<rotate angle="0.000000">
<axis x="0.000001" y="0.000005" z="1.000000"/>
</rotate>
<scale x="1.000000" y="1.000000" z="1.000000"/>
</keyframe>
<keyframe time="0.040000">
<translate x="0.000000" y="-0.310063" z="-0.000007"/>
<rotate angle="0.044933">
<axis x="0.000000" y="-0.000000" z="1.000000"/>
</rotate>
<scale x="1.000000" y="1.000000" z="1.000000"/>
</keyframe>
...
This very simple animation file itself is 8801 lines long, so it's easy to see why assets in video games are what take up the vast majority of the disk space used.
Next up, picking in jMonkeyEngine!
Picture:
Tuesday, May 29, 2012
Hello World
In traditional CS fashion, Hello World!!!
Today I started on my summer research project in making Wind Explorer in a 3D environment, for which I am using the jMonkeyEgine. So far I am liking this engine, along with its website and tutorials. To compare against, I have used the Unity game engine before as well as some direct X experience.
Today I got through the first 6 tutorials, finishing almost all of the exercise in each tutorial. Although I did things a little differently after the 3rd tutorial, as I kept on with the same project from then on and just added each tutorial's aspect to my project, instead of creating a new project and copy-pasting the sample code like the tutorials want. This was I got more hands on with the code and ended up with a much bigger, cooler, project.
One difference between Unity and jMonkeyEngine that I like so far is that jMonkeyEngine uses a tree structure for object handling. What this allows for is mass changes of grouped objects. For example, if you have all the trees in a level under a parent tree node, if you change the rotation of that parent node then all the children will also rotate. Also, the location of the parent node acts like the origin of the children node, which might be a very useful feature.
Edit: Here is a good visual representation of this tree structure:
Link
That's if for today, tomorrow I plan on finishing up the tutorials, or at least come as close as I can.
Picture:
Video:
Today I started on my summer research project in making Wind Explorer in a 3D environment, for which I am using the jMonkeyEgine. So far I am liking this engine, along with its website and tutorials. To compare against, I have used the Unity game engine before as well as some direct X experience.
Today I got through the first 6 tutorials, finishing almost all of the exercise in each tutorial. Although I did things a little differently after the 3rd tutorial, as I kept on with the same project from then on and just added each tutorial's aspect to my project, instead of creating a new project and copy-pasting the sample code like the tutorials want. This was I got more hands on with the code and ended up with a much bigger, cooler, project.
One difference between Unity and jMonkeyEngine that I like so far is that jMonkeyEngine uses a tree structure for object handling. What this allows for is mass changes of grouped objects. For example, if you have all the trees in a level under a parent tree node, if you change the rotation of that parent node then all the children will also rotate. Also, the location of the parent node acts like the origin of the children node, which might be a very useful feature.
Edit: Here is a good visual representation of this tree structure:
Link
That's if for today, tomorrow I plan on finishing up the tutorials, or at least come as close as I can.
Picture:

Video:
Subscribe to:
Comments (Atom)